Do you want to open your online business store with Shopify? Okay, then you are at the right place. Here you can create your Shopify store within 15 minutes because I will guide you through everything and no experienced developer is needed to create a Shopify store.
Shopify is arguably the best platform for your eCommerce store. Because they handle all aspects of your business processing payments, POS administration, fulfillment, marketing, shipping, customer engagement tools, and more. With all these powerful features, you can set up your online business store as an international online brand with Shopify.
Shopify currently has more than 1,700,000 online trade stores in about 175 countries using its platform. Also, see below an example of some popular Shopify customers you know well
- New York Times Store.
- Red Bull.
- Kylie Cosmetic.
- Bulletproof.
- Leesa
This means that world-class brands and large-scale eCommerce sites are built on Shopify. Before we guide you to create an online store with Shopify, let’s provide a quick and concise description of Shopify.
Table of Contents
What is Shopify?
Shopify is a Canadian multinational well-funded SaaS eCommerce platform. They help brands and businesses build online stores to sell products to customers.
It was founded in 2006 by three friends (Tobias Lutke, Daniel Venand, and Scott Lake).
Over the years, seeing steady growth in eCommerce, estimates suggest that by 2024, global volume transactions will be $ 6.5 trillion.
Create a Shopify Store in Less Than 15 minutes
Step-by-Step Guide
Set up e-commerce stores in association with e-commerce merchants, including digital as well as retail shops for individuals to transition.
The basics of getting your eCommerce store with Shopify are very simple indeed. ECommerce sites are similar to basic websites, except that they allow users to make purchases on the site.
Step-1) Sign Up For Shopify Account:
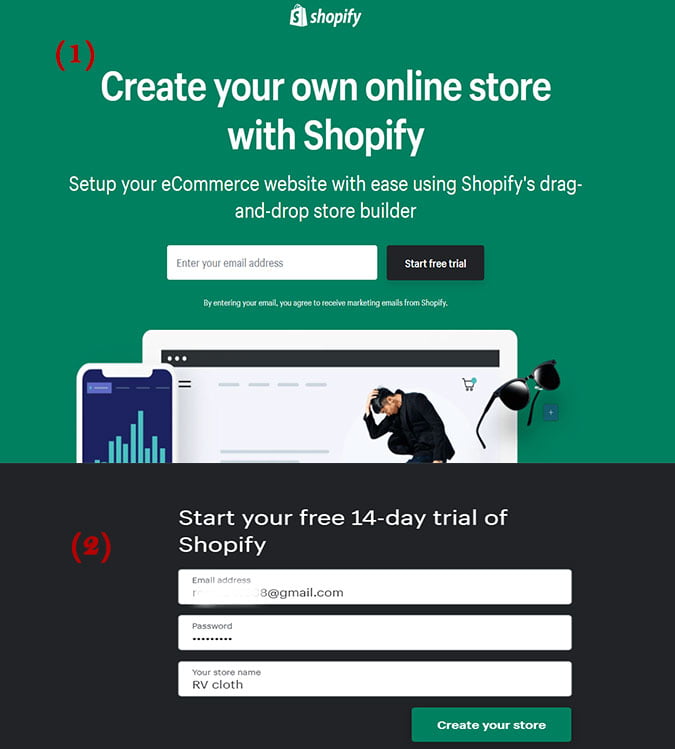
First, create an account with Shopify. The sign-up process is easy. Just an email address and password are required to continue. Navigate to the Shopify website, and click on the Get Start button for further processing. fill in all the required details like email address, password, and store-specific name.
Remember that it is necessary to fill in your specific store name here. Otherwise, Shopify does not allow you to purchase the domain name.
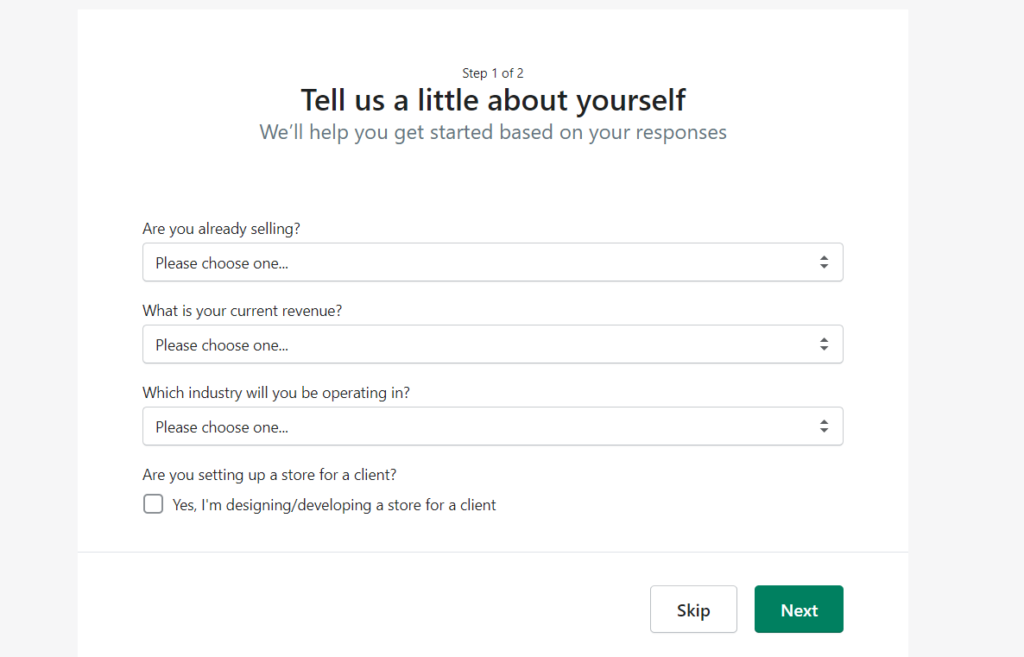
After clicking Next, tell how much you want to sell and if you are already selling. When done,
Click the Enter My Store button:
On this page, you will see two options, see the screenshot image for a better understanding.
You select the option based on your business
If you want to build a brick-and-mortar shop or online shop.
In this tutorial, as an example, we are going to create an online shop, select the option, and click on Next.
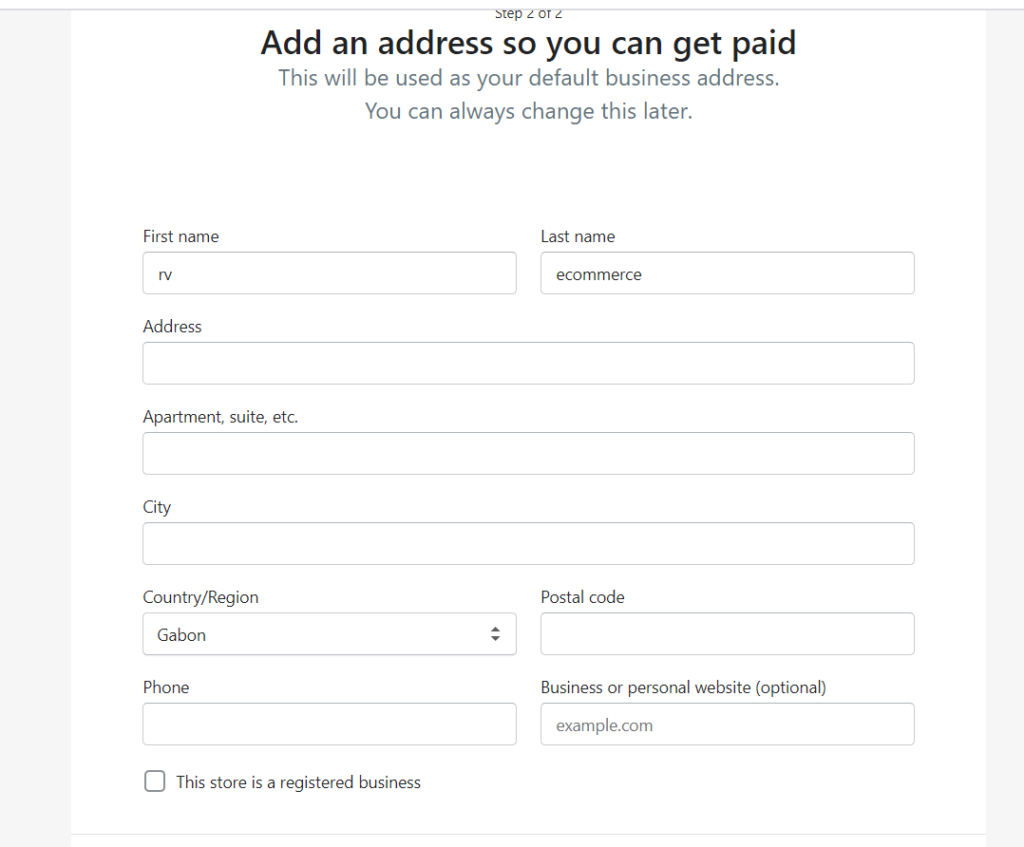
On this page, you are required to fill in personal information such as your name, address, and phone number, which are used to configure currencies and tax rates.
Step -2) Customize Your Shopify Store Look:
On the Shopify platform, you can customize your store and upload products for customers to browse. There are two options for setting up your Shopify store.
Option -1) Shopify Pre-Built Theme:
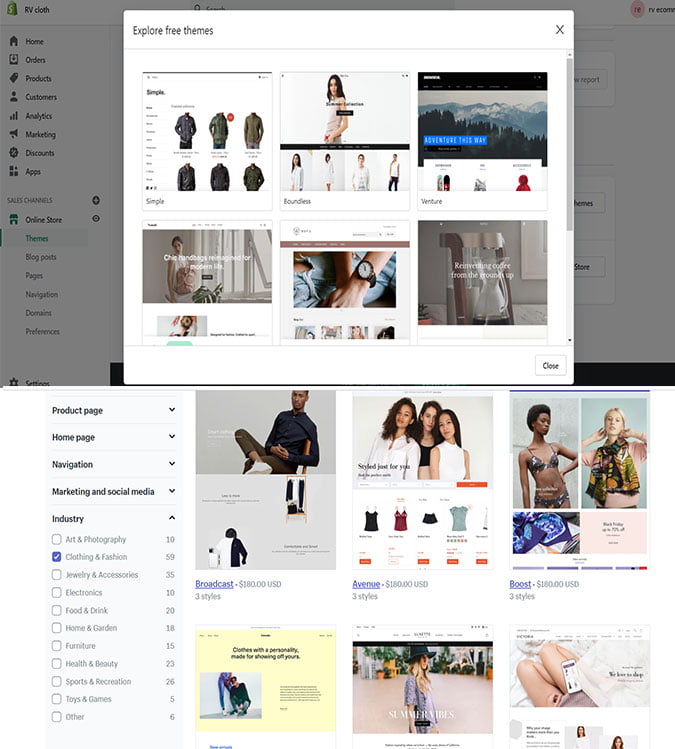
You can use the pre-existing template on Shopify and then modify it so that it looks unique to you.
visit theme.shopify.com
Here you can browse through hundreds of themes in Shopify to make your site look awesome.
Premium topics will come with additional modifications, if you want very small details on your website, it may be a good idea to pay a little extra for this.
If you want to use CSS and HTML aspects. But if you are not a coding expert, you can always refer to the Shopify Experts page for additional help. Shopify Experts has lots of product descriptions, email marketing, and more. Even, you can tap on Shopify Expert Community for anything.
You will be able to change fonts, color schemes, logos, homepage carousel slides, page items, color schemes, etc. with your shopping theme.
Option-2) Create a Shopify Store From Scratch:
If you have the time and want something unique, you can also create a site from scratch, but the Shopify platform uses its own developed PHP language called “Liquid”. If you want to build a Shopify store from scratch then you have to learn it.
Step-3) Add a Product:
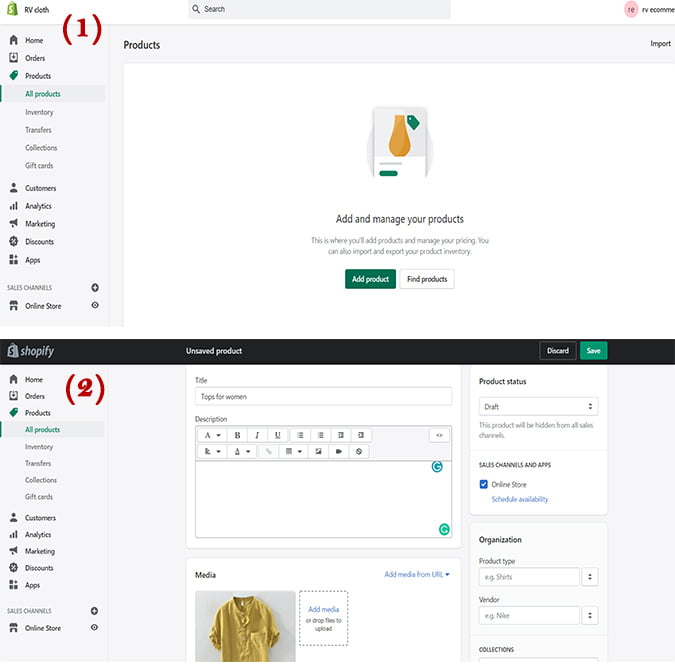
Click on the button, here you can add products in two different ways.
Add Products Manually:
On this option, you manually add the products that you have a list of.
Add your Best Dropshipping Products
This option requires visiting the Shopify marketplace and choosing the best dropshipping supplier or app such as Oberlo.
Product Description:
The description and title of your product should be clear about what the product is. which will help the customer browse through your store and find them.
Make it easy to scan your text, it should be easy to read descriptions with short paragraphs, bullet points, subheadings, and bold text.
Shopify, for the convenience of customers, can organize the same product into different collections and set up collections or groups of top best-selling products according to individual customers’ needs.
Also, if you want instant success and growth in your new dropshipping business. Then read this article on the best and worst dropshipping countries in 2025 to target as drop shippers. Hope this article will surely help you as a new dropshipping entrepreneur.
Product Picture Should Be Clear:
Keep in mind that images associated with your product can create or spoil your chances of selling, always make sure to select images that appeal to your target audience.
Always use high-quality pictures of your products. Avoid blurry or low-resolution images. and Maintain an equal aspect ratio between width and height.
For some products where the customer may need more visual information, such as clothing or jewelry. In this situation, you should use several photographs that can provide more detail to customers and help improve trust.
Step-4) Create Key Pages Of Your Shopify Store:
So far, we have focused on the products. Now you need to help shoppers understand your business, and make them trust you, to increase their shopping of online store products. For all these, you can make these pages most useful under your online store.
About Page:
As a small or new business, this is a great way to earn trust. Introducing yourself as an image, as a founder, or as a video from which you connect with customers, which explains your supply chain. It helps your customers to explain your business model.
Contact Page:
This page gives customers a clear and straightforward way to reach you, simply pointing them to a place to find the answer to your question, such as the FAQ page. You can write some instructions to help customers or help link to another page, such as helping shoppers troubleshoot problems.
You can establish support for even more shoppers with live chat apps.
Policy Page:
In Shopify, you can customize according to your business and local laws: such as a return policy, how much time you can make a return, or in what situation should your policy product be for the exchange. Etc. This policy helps customers to buy from you with confidence.
The Privacy Policy describes how you collect information about your customers.
Shipping policy helps you determine shipping costs, which means customer expectations around delivery speed for the areas you ship.
Step-5) Activate Your Payment Processor:
Click the tab on the left side of the dashboard called Payments. Here you will find many payment processor options. But the first thing you need to decide is what service you want customers to pay for shopping on your site.
Shopify Pay:
This payment is provided directly by Shopify. This allows any type of payment to be processed through your account. But not everyone can use them. Because Shopify Payment is available for a few countries
Although PayPal is available at your store by default, to use it, you have to go to PayPal and create a merchant account.
Payment Gateways:
The most important options. Remember, payment gateway depends on many different things like Transaction fees: must payment gateways charge a small fee each time someone buys something on your website. If you go for the gateway, it gives you the least possible value.
If you choose a gateway payment, it accepts a variety of cards and other payment options, including things like PayPal and Stripe.
Payment gateways will take the payment process away from your website and use a form on your server. This payment gateway strategy can be a bit more secure, but also a bit annoying for customers.
Third-Party Payment Provider:
On Shopify, you can also make payments using third-party payment processors such as Stripe, iPay88, or Worldpay. Unfortunately, there is another ‘but’ here. Before choosing a provider to use, you need to make sure that it is available for your area.
Step-6) Set Up Shipping:
Go to settings and click on the shipping button
However, shipping is the most complex consideration for running an e-commerce business.
There are a lot of variables between product weight, packaging cost, shipping destination, carrier rate, and your potential profit per order.
You can set up multiple shipping configurations to fulfill individual orders, such as domestic or international. Here you can find a shipping strategy that works for you based on your business needs.
Offer Free Shipping:
Free shipping can be an effective incentive for customers to shop with you. But keep in mind if you plan to absorb the cost of shipping on behalf of your customers, you will need to add it to the retail price of your products.
Shipping Zone:
Within this, you can create specific rates based on certain conditions using the Add Rate button.
For example- we can offer free shipping based on the condition that the order reaches a certain price range. Or we can increase the shipping rate if it exceeds a certain weight.
Flat-rate shipping – works best when your products are the same size and weight, making it easy to estimate actual shipping expenses.
Integrate with various carriers such as USPS and Canada Post to create and price shipping options in real-time. This allows your customers to choose the service and price they want. And you can avail of discounted rates through Shopify Shipping.
Give your local customers the option to take online orders at each location, and set specific notification settings, instructions, and other details for each location.
Step-7) Add a Custom Domain:
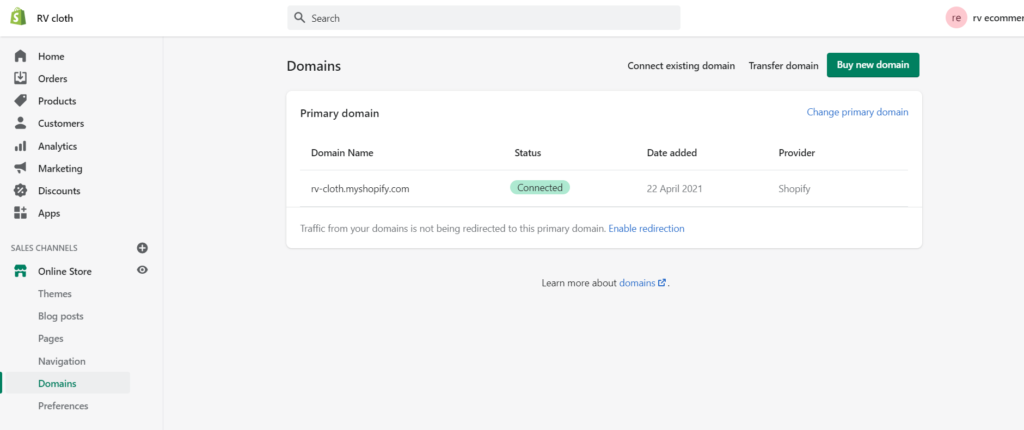
Go back to the dashboard and click on the location that asks to add a domain.
Buying a domain is like taking land on the Internet. Therefore it is called a “web address”.
A custom domain is a fully branded URL that replaces the default URL based on the store name you choose, for example, you can use yourstore.com to replace yourstore.myshopify.com as your public URL.
You can purchase your domain directly through Shopify or you can transfer your domain to another registrar and associate it with your store. It is completely up to you.
After activation, you can go to that particular domain and view your website.
Step-8) Set Up Taxes On Your Shopify Store:
To set taxes, you will go to Settings> Taxes in Shopify. You can edit the default rates if you want, or apply overrides if the specific situation applies to your region or your products.
However, Shopify helps you handle most tax calculations automatically using the default sales tax rates worldwide. Nevertheless, it is good for you to do some research or ask a tax professional whether you are charging the right amount of sales tax or not.
If you are unsure about your tax situation then you should consult with a tax professional. Shopify does not file your sales tax for you
Customize Your Email Notifications:
However, Shopify comes with a series of ready-to-use automated email and SMS notifications to let customers know about order confirmation, status updates, and more.
But If you want to customize them to better reflect your brand, you can edit them under these notifications. Marketing is different for every business, but regardless of your strategy, it is important to establish the right foundation because you can get the most from your efforts while driving traffic to your store.
The Shopify report helps you track traffic and sales through your store across all your sales channels, but to improve your business over time, you can learn where your traffic and sales are coming from,
Facebook Pixel:
Have you ever visited an online store, considered a product, but left without purchasing it, only to see an advertisement for it for a few days? Or have you ever seen an advertisement for a product from a business that you may have never heard of as if it were made for you?
This is made possible through an intelligent code called Facebook Pixel, which learns how people interact with your brand and your website – from liking your social media posts to making purchases – and makes it possible For you to advertise with them over time.
Facebook Pixel learns from all the traffic you send to your online store, so if you plan to advertise on Facebook or Instagram at any point in the future, it is important to set up your Facebook Pixel.
Search Engine Optimization (SEO):
Many shoppers arrive on Google and other search engines as part of their shopping journey,
These search results can help with passive streams of traffic related to the pages of your online store and your products. But this source of traffic takes time to grow.
The area of your store where you want to take SEO into consideration, which is the Title and Meta Description fields, can be found under Settings / Preferences.
And also, you use a free keyword research tool to estimate how many times a month you search for a specific query and what type of search is done around that keyword.
Step-9) Publish Your Shopify Store:
Hope you have completed the entire process, as mentioned above, you can now publish your Shopify store.
Your Shopify store is password-protected during the trial period.
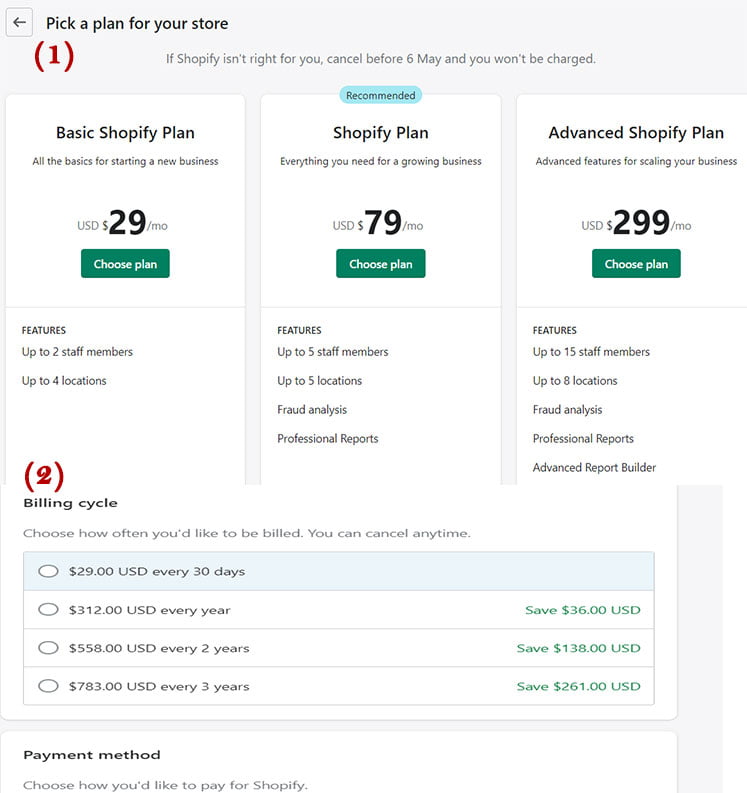
To launch your Shopify store, you will have to sign up for one of their plans. Different plans have different features on Shopify. For example, all transactions on Shopify are done with transaction fees, but higher-level plans will cost you less in those fees.
I’m ready to start! I feel good enough to bet it on marketing time and money and learn from the feedback I get to improve over time.
Congratulation! Now you have a fully functional Shopify store
Do you want to start your Shopify dropshipping business with the best dropshipping supplier in 2025? Then read this review article on Best Dropshipping Supplier List to find the trending products to target customers and countries in 2025. Hope it will help you.
FAQ:
Go to Shopify.com, click “Start your free trial”, enter your store name, and click “Create your store”. Visit the Shopify Theme Store and choose a theme. There are many free options. To save time, try and find one that won’t need many changes.
Is Shopify free to use? No, but you can get started with Shopify on their 14-day free trial. During the trial, you can build your store and make it available to the public
1: Build A Business Plan And Model.
2: Choose Your Products To Sell Online.
3: Build An eCommerce Website In 5 Minutes.
4: Upload Your Products And Start Selling.
The Shopify Lite plan is a one-stop solution for anyone who is already running their own website. But for those looking to upgrade their website with even more sophisticated Shopify functionality.
For example, if you want to sell products for your company without creating an entire eCommerce store. Shopify Lite can do one thing for you.
The print-on-demand Shopify account works through an e-commerce solution add-on. Which is one of the advanced Shopify features available to users. Which you can implement in your Shopify experience.
1. WP Engine
2.DreamHost
3. Bluehost
4. Liquid Web Hosting,
5.InMotion
6.GreenGeeks
7. A2 Hosting
8 .HostGator
9. Hostinger
The Conclusion:
Here I have explained in detail how to create a Shopify store.
If you follow all these steps, anyone can create an e-commerce store on Shopify within 15 minutes. Through this process, you can easily create your online store without gaining coding knowledge or technical experience.

Hey, I am a fashion designer by profession and a blogger by passion, I regularly do extensive research on all things online and I am passionate about spreading my knowledge and supporting people in their online business journey. During my spare time, I like to travel to hilly places and further improve my skills by learning various things.


4 thoughts on “How Do I Make My Own Shopify Store Free In 2025 – Step-By-Step Guide”